Client Benefits – A Tool for Validation
October 31, 2010
The ultimate in validation would be measurable benefits for your client when the project is done. What would those benefits be? How do you measure them? What are the measures? I am not talking about cost/benefit analysis. Landscape design is too esoteric for that. Too many benefits are intangible. You may save the client money with your design approach or reusing materials, which certainly are benefits, but that is not the type of benefit I am referring to.
Let’s start with a classic client interview question. “What will be different, better, etc. when your landscape project is complete?” Your client can give you a multitude of answers. Most of us ask this question seeking to identify client needs. If we know what the client wants to be different or better, we have defined a need that can be addressed. But is there anything in the client’s response that is measurable? Is there a benefit we can measure and track to show how we improved it for the client?
When I stop and think about this question I think there are things you could measure. If a client asks for a quieter space, you could do ambient sound measurements before and after. If a client asks for more entertaining space you could measure the space pre and post project. But are these examples really the benefits we are looking for? If I could measure the client’s satisfaction with their outdoor space when I first interview them and then measure it again after the design and install is complete, I would have a valid measurement of the increase in their satisfaction. Unfortunately, satisfaction measures are intangible. Getting rave reviews from the client is great validation but you are relying on your design to come through and for the client to actually give you those kudos.
There is a benefit for you in thinking about your client’s benefits at the beginning of a project. Let’s take a look at a couple of examples. Assume the client is complaining of a lack of shade in their current entertaining space. During your site analysis you could do some calculations and measurements and determine that the existing space has ninety square feet of shade on an average day between May and August. If your design increases that, you have the data to present to the client during the design review that your design increases the entertaining space shade from ninety to one hundred seventy square feet, almost doubling it.
Another example might be an unsightly view. Depending upon the circumstances you may be able to say that you were able to partially or fully obscure it with your design. There are other ways to handle this. First, a digital photo of the current view can be overlaid with a drawing showing the fence, softscape, or whatever approach you are using to obscure it. With 3D design software you would be able to pan around the area and show the client the new view.
Having benefits that you can address gives you an opportunity to use the Feature / Function / Benefit approach in your proposal. Addressing many specific benefits may also allow you to be more aggressive in your pricing.
This comes back to the real fundamental issue, validation is making sure that client needs are addressed in the design. Having a design objective that is a benefit for the client, and preferably one that is measurable, makes validation even easier.
The Features / Functions / Benefits Approach
August 4, 2010
Years ago, I knew a person who was going through sales training for a major computer company. They used an approach called feature/function/benefit selling. In this approach you talked about the products features (what it has), functions (what it does), and benefits (why it is important). I am going to use a built in gas fire pit as an example.
At a micro level, the gas fire pit has many features, functions, and benefits. Here are just a few examples:
| Feature | Function | Benefit |
| Runs on natural gas | Always available | No tanks to replace or refill |
| Clean | No debris or ash to clean up | |
| No smoke | ||
| Electronic ignition | One button to turn on | Easy to use |
| Wire mesh cover | Keeps out debris | Ease of maintenance |
| Safety | Prevents accidents |
As you can see, features can have more than one function and functions can have more than one benefit.
As designers, we don’t often delve into the micro level. Let’s look at the gas firepit from the macro level. What are the features, functions, and benefits of having it as part of the design solution?
| Feature | Function | Benefit |
| Fire | Creates ambience | Provides subtle lighting |
| Establishes a gathering place | ||
| Provides warmth | Makes cool evenings more comfortable | |
| Extends outdoor season | ||
| Built In | Safety | Cannot be accidentally toppled |
| Natural gas fuel | Ease of use and maintenance | |
| Integrated into patio | Looks like a natural extension of the space |
I have used the feature / function / benefit approach in a number of proposals and client presentations. It is a great way to convey to the customer the benefits your product or service offering provides. It justifies the benefits by tying them to specific functions and features. The most difficult part is developing the three distinct components. Features often overlap or are very similar to functions and functions often overlap or are very similar to benefits.
There are three reasons for bringing up the features / functions / benefits approach. First, it can be useful in a design review or a client presentation. It is a great tool to use to talk through your design explaining how specific features provide functions that provide benefits. Second, it is very closely related to the design process. When you are designing something, you have to look at it from the other direction. What benefits do you want to create in your design? What functions will provide those benefits? What features do you include to provide those functions?
The table below shows how feature / function / benefit analysis ties into Client Interaction and the Design Process:
| Client Interaction | Design Process | |
| Feature | What the client asks for | Client interview and observation |
| Function | How the client intends to use it | Client / site analysis |
| Benefit | Why it is important to the client | Design solution |
When we get to the point of developing design solutions, we should be addressing how we are going to benefit the client by providing a space that meets their needs, provides the outdoor experience that want, and is aesthetically pleasing. During the client interview stage, we are learning what the client wants. Clients usually ask for features. They want entertaining space or comfortable seating areas. They are seldom asking for benefits. That information is what we use to determine the functions we need to provide. We do this during the client analysis and site analysis. Creating or developing our design solution is where we translate the features and functions into benefits for the client.
The third reason for bringing up the feature / function / benefit approach is that it also supports the validation concept. Being able to trace benefits in the design solution back through the functions that were developed through analysis and then back to the clients feature requests is an excellent validation method. You get the added benefit of having a ready-made template of features, functions, and benefits for your client presentation.
Old School, New School; Is it the right school?
October 27, 2009
I read an interesting article I found online last night. The article, “Sell Landscape by Visual Design”, by Susan Wessling, was published in Irrigation & Green Industry magazine. It is now in their digital edition (http://www.igin.com/article-428-sell-landscape-by-visual-design.html).
The article is about using digital photos and photo imaging software to create design mock-ups. The author describes the old school traditional approach of visiting the client and making your pitch. However, she describes the typical resistance from the client, “we would hate to spend all that money and then find out that were not as happy with the look as we thought . . .” The author describes this as blind faith selling.
The new school approach is to take some digital pictures at the client site, go back to the office, and use one of the many digital imaging software programs to mock-up a design. In the author’s words, “Your potential customers don’t have to envision, they can actually see what they will be buying.” The digital photo is used as a sales tool to close the deal. The author quotes statistics from Drafix Software, makes or Pro Landscape, that “contractors close 90 to 95 percent of their sales leads when making this type of presentation.”
The article goes on to describe some of the software available and how some landscape designers are using it. The article is from 2001 so there is a lot more software with much better capabilities available now. Even though the article is fairly old, it is worth reading just for some of the techniques about how to use this type of software.
As you may have gathered from this blog, I am a big promoter and user of this technique and the underlying software. I have used it in proposals, client reports, presentations, and in ideation and analysis. My concern is that this technique, used as a sales tool, may hurry the design along without any underlying analysis. My fear is that it will be used to circumvent the process to the detriment of the client. I don’t think you can quickly mock-up a digital photo and say to the client, “Here it is. This is what we will do for your landscape.” We still need to go through the fundamental analysis process to make sure the design is right for the client. Also, the digital mock-up may set an expectation for the client that is inappropriate or impractical. Care must be taken with this approach to make sure you are presenting concepts not de facto decisions.
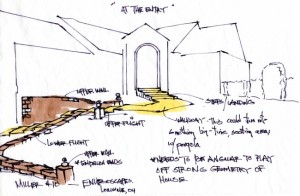
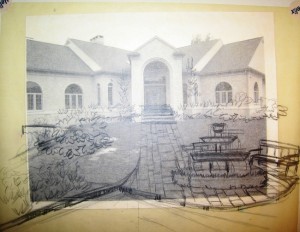
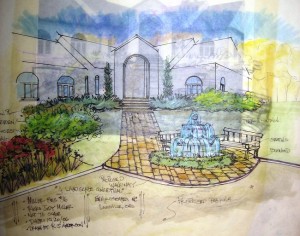
This approach does not necessarily require imaging software if you are into hand drawing. I have mentioned Rick Anderson’s Whispering Crane Institute web sites before. His Fotki.com site has dozens of outstanding images that show his work. What I find particularly impressive is his approach of taking a digital photo and overlaying it with trace paper to build up a design. A few examples are show below.
The link to Rick’s Fotki gallery is: http://whisperingcraneinstitute.fotki.com/
The link to the photo gallery where these images are found is: http://whisperingcraneinstitute.fotki.com/radgraphic2006/en-rjm_033006/
“One Pagers” – A Great Client Presentation Tool
September 19, 2009
I my last post I discussed using thumbnail bubble diagrams for a more graphic representation of the potential design. I mentioned that one of the benefits of this approach was for soliciting client feedback. Since the bubble diagram is more visually descriptive, the client can get a better sense of how the areas fit and work together.
Another adaptation of this approach is to overlay a copy of the base plan with text and graphic elements that you can use to do any or all of the following:
- Summarize key findings
- Identify major issues
- Emphasize major opportunities
- Review design goals
- Highlight priorities
- Raise questions or identify decision points
Essentially, what you are creating is a one-page presentation that has some of the elements of a bubble or functional diagram on top of the base plan. The purpose of this document is to solicit client feedback, get client agreement, or pose questions for the client. Depending upon what the content is and your objective, what you include may be text, simple graphics, pictures, or drawings. For example, an area with a major opportunity to capitalize on the view may be depicted with an arrow pointing in the direction of the view and some limited wording. Design goals could be listed in a text box with bullet points. Problem areas could be a digital photo cropped and reduced in size to fit on the appropriate spot on the base plan. You can use color coding and/or different shapes to emphasize unique elements or points you want to cover with the client. Obvious choices such as red for problem areas make this type of visual tool easy for the client to understand.
For small simple jobs, this approach may work for presenting your estimate for work. In addition to providing the client with the cost estimate and contract, you could include a simple one-page graphic describing what needs to be done and why. A simple devise such as this can be extremely effective for communicating with the client.
For larger jobs or situations where you cannot get everything to fit on one page you have a couple of options. One is to make multiple copies of the base plan and put different content on each copy. For example, opportunities on one page and problems/issues on another. If you are working on a large property, you can crop the base plan graphic and do a page for front yard and a page for back yard to present the information for each area. Very large or complex properties may use even more pages.
I still like format reports / proposals for final submission to the client when my design program is complete and I am ready to get client approval. For smaller jobs or situations where you need to give an interim update or meet with the client to resolve issues, get clarification, etc. the one-page presentation graphic is a great tool.
Words and Phrases as Visual Tools
September 15, 2009
Words can be a very powerful graphic tool also. They can be used to solicit responses from clients and be used to produce responses from clients. I think of this in some ways as one of the HGTV effects. If you look at the titles of any of the landscape design shows you will see titles such as “Stylish Mediterranean Patio,” “Spacious Outdoor Getaway,” or “Intimate Backyard Oasis.” These titles help us picture what the result might be before we even see it. You can use words the same way with clients.
First, I always listen for verbal queues from clients. If they use words such as cozy, open, contemporary, etc. those give me clues as to their preferences and a way to validate their preference in my design. Second, there are sometimes words you can use to create a picture for a client. If you use a word and the client begins using it also, you have established a common ground of understanding. For example, I may use the term “welcoming” to refer to a front entryway. If the client uses the same word later in the conversation, I have made a connection that I can use in my design.
Whenever I do find specific words that I can identify as important to clients and their needs I try to use those words in any drawings or plans that I provide them. The title on a drawing, for example, may be “Flexible Outdoor Entertainment Space” or “Multi-use Patio”. This simply reinforces our communications and mutual understanding of what the needs are and what the desired outcome should provide. Even if I do not come up with a client inspired wording, I will create my own to make the concept come alive and hopefully inspire the client to accept it.
I also try to user the specific words or phrase within any other correspondence, proposals, or working documents. Again, this is to reinforce the concept. The shared vision can become real in the client’s mind just by reading the words.
Validation – the Impact on Proposals and Pricing
August 21, 2009
I classify landscape design as a professional service. Like any professional service provider, designers have a dilemma in deciding how much work to put into a client job in order to actually get a job or contract. The typical scenario is that the designer meets the client and evaluates the site. They use that information to create a proposal to do the actual design work for the client. The problem that arises is twofold. How much do you need to know to accurately price your proposal for the work you are going to do? Second, how much time do you spend gathering that information and analyzing it to come up with a proposal price?
I have been advocating spending more time gathering information about the client and the site and spending more time analyzing that data. In previous posts, I have tried to justify this additional time based on the value it adds and the benefit of using the analysis to validate design decisions. From the standpoint of results, higher client satisfaction, more repeat business, and more referrals, I believe the additional time and effort are well worth it. In addition, I have tried to make the point the a lot of the tools and techniques are highly reusable. Once you have done it once, you have a template or a model you can reuse on future jobs. Once past the learning curve and creating the first set of templates for analysis, the time required to create them is reduced.
There are at least a couple of situations that may arise. First, there may be those clients that you just can’t get a handle on what they want or what they are looking for. Second, the potential job is very large and/or has a lot of complex components. In the first case, if you do not have a handle on what needs to be done it is obviously difficult to price a potential design. Before you can even start, you will need to draw out the client and find out what their expectation are and why they want the design. You will need to factor in additional time for some “discovery” work.
The second scenario of a very large, complex job has a couple of potential solutions. One solution is to simply make the best estimate you can of the time that will be required to get more information from the client and to analyze all of the components of the site that will need design work. Another solution is to explain to the client that a certain amount of pre-design work is required and that you would like to price that separately. If the client is agreeable, a proposal for the evaluation work can be created quickly. The scope of this proposal would include the work for additional client needs research and detailed site analysis. The deliverables for the client could be the results of this work in a report format as well as the proposal for the actual design work. I believe this approach benefits the client in that they are spending a lower amount to obtain a more accurate, complete proposal. The designer benefits from having lower risk of under pricing the design.
This type of pre-proposal evaluation contract is frequently used in consulting work. I have also seen it used in systems development projects where a limited amount of funding is provided to develop requirements and the costs for a large systems development project. The intent in both cases is to make sure that all of the requirements are identified. Capturing all of the requirements is essential if the result is going to meet the client’s expectations.
Focusing on requirements validation requires some careful re-thinking of how to price and propose design services. As the service provider you have to make sure you understand what needs to be done to meet the client’s expectations and what you need to do to achieve that goal.
Expanding Project Scope the Right Way
August 13, 2009
Every design job has a scope. Scope defines what work is to be done for the client. Sometimes this is defined in the proposal under a header, “Scope of Work” or “Scope of Services”. In many fields, scope management is a huge issue. You may have heard the term “scope creep” when clients keep asking for little changes or add-ons to a project. Designers need to carefully define the scope of work they propose and also be alert for scope creep in their projects.
The scope of work a designer proposes should very carefully specify what the project deliverables are. The deliverables are the actual plans, drawings, sketches, lists, etc. that the designer is proposing to provide the client in addition to the actual work that underlies them. By specifying exactly what is to be created and delivered to the client, the designer is drawing a box around what they are obligated to produce. However, I believe that a lot of the analysis work and documents that a designer creates during the course of a project should be given to the client in a polished, professional looking format.
If a designer proposes to provide a client with a detailed design, construction details, and planting lists, they have defined exactly what they need to produce and deliver. If in the course of client and site analysis, they produce charts, drawings, or other analytical materials that document their thinking and logic behind the design, these materials should be considered for inclusion in the client deliverables. There are several reasons for this. First, they demonstrate the thought and logic that was put into the development of the design. Second, they demonstrate the value added by the designer in considering the variables and alternatives that were available. The most important reason for including this additional documentation is that if it supports the design decisions, it provides validation of the design against the requirements and other facts that were gathered.
I would go so far as to say that any package of deliverables should include a nicely formatted report that provides the client with all of the information about the project and how the design evolved. The report could begin by stating what was discovered during the site analysis and client need analysis. Any matrices or other analytical charts or drawings could be included to support the logical development of the preliminary plans. Any criteria or measurement that was applied to the evaluation of preliminary plans could also be included to support the evolution of the final design.
These are materials that the designer has already created. They can be scanned into a computer or re-created with a graphics package to make them more polished. The intent is to give the client a clear picture of the logic that went into the development of the design and to re-affirm how the client’s needs are being met by the design.
I am a big believer in reusing materials or re-purposing materials. Once a designer has created one of these reports, it becomes easier to create the next one by simply editing the document for the next client. This is also true for any graphs or diagrams that were redone for presentation. These types of materials are easily edited on the computer and reused for other clients. I always try to leverage any existing materials.
In spite of the cautions about managing scope, designers should be prepared to offer their clients a little bit more to demonstrate the quality and professionalism of their work. Including the details also substantiates the design against the requirements.
Mind maps are one of the most useful tools I have ever been introduced to. They are a simple graphical tool for building ideas, organizing information, creating plans, collecting brainstorming ideas, and numerous other organizational activities. I use them throughout a project to develop initial ideas and subsequently to organize notes and develop presentations, proposals, and reports.
Mind maps can be created on paper, a whiteboard or chalkboard, or on a computer. There is software specifically for mind mapping but you can also use PowerPoint, Visio, or any other graphic program that lets you create shapes and lines.
You start a mind map with a central objective. You may be analyzing a site, organizing client needs, evaluating alternative designs, or brainstorming an idea. That central idea is expressed with a symbol such as a circle or oval. Let’s assume we are trying to organize our site analysis information and we are going to use a mind map to visually record our notes and observations. On our paper we start with a descriptive symbol.

Starting block for sample site analysis mind map
We decide to organize our information by area so we add three symbols to represent each area.
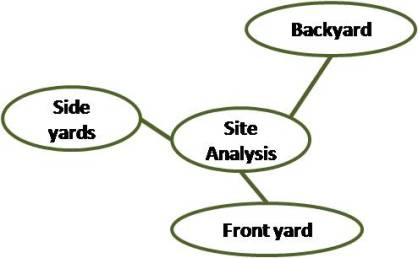
Sample mind map with second level of sub-topics (areas) added
As we walk through each area we add symbols to identify any problems, issues, areas, or observations. After completing the front yard we might have something like this:
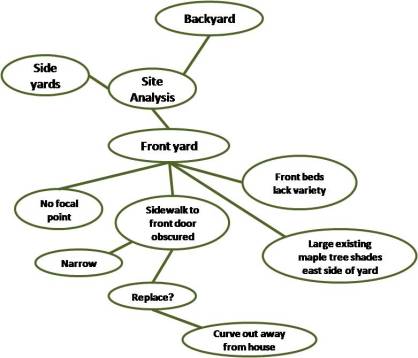
Sample mind map with front yard area flushed out
Each secondary bubble is flushed out. They do not have to be done sequentially. As thoughts or ideas come to mind, simply add them in. The mind map is filled out by adding detail to each layer of bubbles. In this example, the mind map might be done sequential by walking around the yard. However, in passing through the areas, new thoughts may come to mind that can be added. When the mind map is completed for all areas in might look something like this:
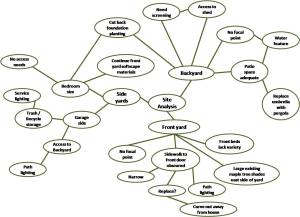
Completed sample site analysis mind map for all three areas
The mind map can be used as part of the data gathered to begin preparing a design program. Mind maps that are created electronically with a graphics program or software specifically for mind mapping are easily modified. If you subsequently think of another way to organize the information the data can be moved around are reorganized easily.
There are many ways to use mind maps in the design process. There are also many ways you can enhance a mind map to make it more meaningful and to add clarity. Making enhancements to a basic mind map is an excellent way to review the data and analyze it in different contexts. Subsequent posts will address some of these enhancements and how they can be used.
 RSS Feed